
In this lesson we are going to learn how to give your simple cartoon just a little bit of emotion. I was heard a professional cartoonist say “If you’re going to mess up on anything make sure its not the eyes.” When it comes to drawing everything is important but the eyes by themselves can destroy and entire piece of art. You’ve heard that the eyes are the window to the soul, I bet it was an artist that originally said it first. All expression begins with the eyes and communicates through body language and then finally spoken word.
So lets get to it. These eyes were easily drawn in inkscape (If you don’t know by now I really love Inkscape, its vector based software and best of all its free) using simple circles. The eyebrows are just curved lines but when put in different arrangements they convey different emotions(you‘ll notice that most of it is just the eyebrows doing most of the work). I’ll explain each number.
1. This is just the run of the mill happy expression. Eyebrows slightly raised and open. When added to a face it makes it look happy.
2. Basically the same as the first with one difference, the eyebrows are raised way higher. This helps convey surprise or a more extreme joy.
3. This brings in the eyebrows and eyelids in the opposite way as the two previous. By flipping the eyebrow the other way it helps show a bit of concern when added to the eyes it shows worry.
4. If the eyebrows on the outside show worry when on the inside it totally changes from worry to anger. Everybody is familiar with the anger face because everything around the inside of the eyes bunches together.
5. When the eyebrows are even and more than halfway down the face it presents more of a mellow or sleepy feeling. This one is less about eyebrows and more about eyelids.
6. The classic confused face. It is the only one that is classically asymmetric. By adding one eye of happy and the other of worry they combine to create a bit of worry.
7. Closed eyes with the same angle as the happy eyebrows creates a laughter or another extreme joy emotion. When added to a smile it looks like the face is laughing.
I used the same basic face to show that the eyes are the main source of emotion. I hope you enjoy this one, more to come in the future. If you have any suggestion be sure to leave them in the comments.
Its that time again, time for a drawing lesson- Drawing A Simple Cartoon Character Using Circles. I really enjoy drawing and If I haven’t said it before I’ll say it right now, ANYONE CAN LEARN TO DRAW!! I know this because there are basically 2 types of thinking brains in this world, the artistic and the analytical, everything falls in between. Drawing can be completely artistic or completely analytical. But if you have never done it in your life then I see how it can be intimidating, especially after seeing the cartoons on tv or the comics in the paper all your life. Let me assure you I am not a great artist by any stretch of the imagination, I just have loved drawing since I was a kid and as an adult have fallen in love with it all over again. The only difference is now I want to share my love with the world and give people the opportunity to fall in love with their own creative side as well. With that being said lets get to it.
Draw your cartoon character in just a few easy steps:
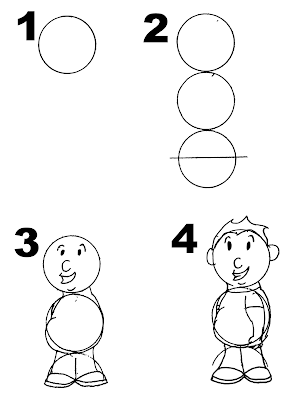
1. Draw a circle….. Boom, its that simple!
2. Now you’re going to draw 3 circles stacked on top of each other in a straight vertical line.
2.1. Draw a line horizontally through the bottom circle to cut it in half, we will only be using the bottom half.
3. Next, the top circle is going to be the head so you’re going to add eyes, eyebrows, a nose, a mouth, and a small curved line for the chin.
3.1. The 2nd circle is going to be the body so for the purpose of this cartoon we will use a wide bean shape for the body. (as a side note you can vary the bean shape to make a fat short or even a tall and more slender character)
3.2. The bottom half circle is going to be where the legs and feet are. You can make the legs and feet any way you would like…. The way I have demonstrated in the picture is just my favorite quick way to draw them.
4. Then you will be drawing ears and hair on the top circle. To connect the 1st and 2nd circle draw a line on the left and right side towards the bottom of the 1st and top of the 2nd to be the neck. A curved line at the bottom of the neck lines will be the collar of the shirt.
4.1. On the 2nd circle you will draw an arm coming out of a sleeve of the shirt. This can also be drawn anyway you would like but the way I have drawn is just a simple quick way with the 4 finger typical cartoon hand. Due to the direction the body is pointing is why you cannot totally see the other arm, if you notice I have only drawn the top with the body in the way.
The final step is just to erase all the unnecessary lines that come from the original 2 ½ circles and there you have your first simple cartoon drawn from 3 circles.
P.S.- There will be future posts going into more detail about each body part and then it will be on to more complex characters. If you have any suggestions or request for drawing lessons leave a comment and I will do my best to get it done. (just so you know I would like Thursdays to be the new drawing lessons day)


